Difference between revisions of "Virtual appliance instructions"
(Make deprecation warning more visible.) |
|||
| (116 intermediate revisions by 11 users not shown) | |||
| Line 1: | Line 1: | ||
[[Main Page]] > Virtual appliance instructions | [[Main Page]] > Virtual appliance instructions | ||
| + | {| class="wikitable" style="background-color:#ffcccc; font-size: 120%; font-weight: bold; " cellpadding="10" | ||
| + | | Please note: Virtual appliance instructions were for last beta release: 0.10 - these notes are no longer supported. Instead please see: [[Getting started]] | ||
| + | |} | ||
| + | = Distribution as a Virtual Appliance = | ||
| − | Archivematica is distributed as a [http://en.wikipedia.org/wiki/Virtual_appliance virtual appliance] which integrates a number of software tools into one common virtual machine environment. | + | Archivematica is distributed as a [http://en.wikipedia.org/wiki/Virtual_appliance virtual appliance] which integrates a number of software tools into one common virtual machine environment. A virtual appliance is one file containing a minimal operating system and server software. You can "play" this file with a free virtual machine player like VMware Player or Sun VirtualBox. |
| − | This allows | + | This allows Archivematica to be run on almost any workstation or server hardware without compromising the host machine's operating system or application software. At the same time, the virtual appliance is able to interact with any number of networked and/or external storage devices to allow for the flexible implementation of an archival storage and backup strategy. |
*See the [[software]] page for a full list of the tools used in each system release. | *See the [[software]] page for a full list of the tools used in each system release. | ||
*See the [[documentation]] page for instructions on how to use the virtual appliance to accomplish the system [[requirements]]. | *See the [[documentation]] page for instructions on how to use the virtual appliance to accomplish the system [[requirements]]. | ||
| − | + | </br> | |
=Minimum hardware requirements= | =Minimum hardware requirements= | ||
*Processor: Intel core 2 or AMD Opteron | *Processor: Intel core 2 or AMD Opteron | ||
| − | *Memory: | + | *Memory: 2 GB for the virtual appliance ('guest') operating system, i.e: if the 'host' operating system has 4 GB available, 2 GB needs to allocated to the 'guest'. Depending on the operating system, machines with less than 2 GB total memory will likely have trouble running Archivematica. Note that the default allocation setting in Archivematica is 512 MB; however, the more that is allocated the better the system will run. The setting can be changed once Archivematica is running. |
| − | *Hard Drive space: a minimum of | + | *Hard Drive space: a minimum of 3 GB to test the system on a small scale (i.e. use the available test files or import a small set of test files); 12 GB or more for larger implementations |
| − | + | </br> | |
| − | = | + | =Instructions for using the VM image in VirtualBox= |
| − | *Archivematica uses the [http://en.wikipedia.org/wiki/Open_Virtualization_Format Open Virtualization Format] and has been tested with the free and open-source [http://www.sun.com/software/products/virtualbox/index.jsp | + | ==Install Oracle Virtual Box== |
| + | |||
| + | *Archivematica uses the [http://en.wikipedia.org/wiki/Open_Virtualization_Format Open Virtualization Format] and has been tested with the free and open-source [http://www.sun.com/software/products/virtualbox/index.jsp Oracle Virtual Box ] virtualization platform. | ||
*There are VirtualBox versions available for every major operating system. | *There are VirtualBox versions available for every major operating system. | ||
| − | **Download and install | + | **Download and install Oracle VirtualBox: [http://dlc.sun.com/virtualbox/vboxdownload.html http://dlc.sun.com/virtualbox/vboxdownload.html]. Note that if you are installing VirtualBox on Windows you will have to click through a number of warnings that you are attempting to install non-verified software. |
==Download Archivematica == | ==Download Archivematica == | ||
| − | *[ | + | *[http://archivematica.org/download Download] the latest version of the Archivematica appliance. |
| − | *Unzip the Archivematica file. This should result in the following | + | *Unzip the Archivematica file. This should result in the following file appearing in an Archivematica folder: |
| − | ** | + | **archivematica-0.10-beta.vmdk |
| − | + | ||
| + | </br> | ||
| + | <div class="note"> | ||
| + | <strong>Remember:</strong> | ||
| + | </br> | ||
| + | Be sure to take note of what location on your computer you choose to extract the file, so you can browse to it later when setting up the virtual appliance (instructions below). | ||
| + | </div> | ||
| + | </br> | ||
| + | |||
| + | == Start Archivematica virtual appliance == | ||
| − | |||
| − | + | <ol> | |
| − | + | <li>Open the Oracle VirtualBox virtual machine.</li> | |
| − | + | <li>Click New</li> | |
| − | + | <li>Click Next</li> | |
| − | + | [[File:new_next_VMWizard.png]] | |
| − | + | <li>Set the name and type OS type (archivematica, linux-ubuntu)</li> | |
| − | + | [[File:2_VM_Name_OS_type.png]] | |
| − | + | <li>Click Continue / Next</li> | |
| − | + | <li>Set Memory to 2 GB (2048 MB) or higher</li> | |
| − | |||
| − | |||
| − | |||
| − | |||
| − | + | <li>Click Continue</li> | |
| − | + | <li>Select 'Use existing hard disk' and browse to and select archivematica-0.10-beta.vmdk</li> | |
| + | <li>Click Continue. Review Summary and Click Create</li> | ||
| + | <li>The virtual box will open with Archivematica 0.10-beta listed on the left-hand side (in some cases "archivematica" will be listed on the left-hand side). Select Archivematica 0.10-beta and click Start (the green arrow in the menu).</li> | ||
| + | [[File:6_start_archivematica_VM.png]] | ||
| + | <div class="note"><strong>USB Warning at Startup?</strong> | ||
| + | </br> | ||
| + | [[File:error_USB_setup.png]] | ||
| + | </br> | ||
| − | + | Depending on the setup and configuration of your computer peripherals, you may get this warning the first time you try to launch the Archivematica virtual appliance. Don't worry - it has nothing to do with the installation. We suggest simply checking "Don't show this message again," clicking OK, and proceeding. If you do want some guidance on troubleshooting USB detection in the Virtualbox, you can look at Oracle's troubleshooting instructions for USB detection in Linux [http://www.virtualbox.org/manual/ch12.html#ts_usb-linux here]. | |
| + | </div> | ||
| + | </br> | ||
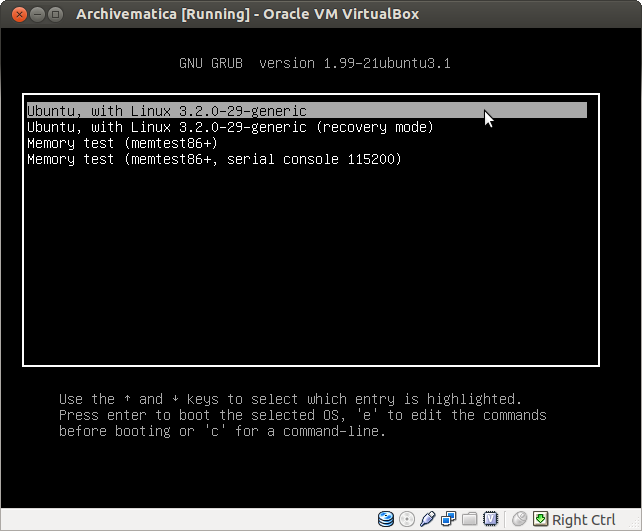
| + | <li>As the virtual appliance starts, you may have to select your machine from the list of available options. Hit return. | ||
| + | </br> | ||
| + | [[File:inside_the_VM.png]] | ||
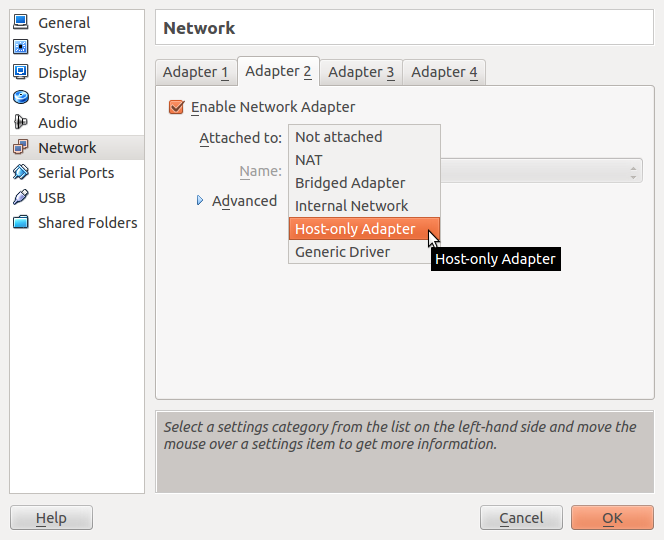
| + | <li>From here it is suggested that you use your external browser to access the archivematica dashboard. Due to an issue with the Ubuntu 12.04.1 desktop, we suggest you add settings to allow the Archivematica dashboard and ICA-AtoM to be accessed from your web browser, outside of the virtual machine. The steps are as follows [Please note, you may need to adjust your virtualbox preferences prior to taking this step. To do so, simply go to the network section of virtualbox preferences and click the "add" button, then save your change): | ||
| + | <ol> | ||
| + | <li> Shut the virtual machine down if it is open. | ||
| + | <li> In virtualbox select the archivematica virtual machine and click on Settings | ||
| + | <li> Click the 'Network' tab | ||
| + | <li> 'Adapter 1' should be set to NAT by default (this allows you to get to the internet); click on 'Adapter 2' tab | ||
| + | <li> Click enable adapter and set attached to 'host only adapter' | ||
| + | </br> | ||
| + | [[File:selecting_host_only_adapter.png]] | ||
| + | </br> | ||
| + | <li> Start the virtual machine | ||
| + | <li> In your web browser, go to the url http://192.168.56.101/transfer/ (there is no need to login to the Archivematica virtual machine first). For ICA-AtoM, go to http://192.168.56.101/ica-atom/. | ||
| + | <li>Congratulations! You can now use both Archivematica and ICA-AtoM via your web browser. | ||
| + | </ol></li> | ||
| − | + | * Log into the Archivematica dashboard using the user name ''demo'' and the password ''demo''. | |
| − | * | + | * If your mouse pointer does not appear to be working in the virtual machine, click the letter f while holding down the right-hand control button. Do the same thing to switch back to using your mouse pointer outside the virtual box. |
| − | |||
| − | |||
| + | <li>Congratulations, you have a running copy of Archivematica! See [[Documentation]] for instructions on how to use the software.</li> | ||
| + | </ol> | ||
| + | </br> | ||
| + | <div class="note"> | ||
| + | '''Important:'''</br> Archivematica may appear to crash when used as a virtual appliance. See Ubuntu login reset issue, below. | ||
| + | </div> | ||
| − | + | === Permissions === | |
| − | |||
| − | |||
| − | |||
| + | Users that are depositing files via ssh should be added to the archivematica group. | ||
| − | + | This can be done with: | |
| − | + | $ sudo useradd -G archivematica Username | |
| − | |||
| − | |||
| − | |||
| − | |||
| − | |||
| − | |||
| − | |||
| − | |||
| + | In the Virtual Machine, the demo user is already apart of this group. | ||
| − | + | At a minimum, your deposited files should have the following permissions in order to upload them to the dashboard through source directories in the administration tab: rw-rw---- or rwxrwx--- | |
| − | |||
==Turn off virtual machine== | ==Turn off virtual machine== | ||
| − | *At the end of your session, turn off the VirtualBox virtual machine by going to Machine > Close > and selecting one of the three shutdown options. It is best to choose either "Save the machine state" or "Send the shutdown signal". This is from the VirtualBox help manual: | + | *At the end of your session, turn off the VirtualBox virtual machine by going to Machine > Close > and selecting one of the three shutdown options. It is best to choose either "Save the machine state" or "Send the shutdown signal". |
| + | #: | ||
| + | [[file:archivematica_shutdown.png]] | ||
| + | #: | ||
| + | [[file:archivematica_shutdown2.png]] | ||
| + | #: | ||
| + | |||
| + | |||
| + | This is from the VirtualBox help manual: | ||
<blockquote>3.4.3. Saving the state of the machine</blockquote> | <blockquote>3.4.3. Saving the state of the machine</blockquote> | ||
Latest revision as of 13:57, 20 June 2016
Main Page > Virtual appliance instructions
| Please note: Virtual appliance instructions were for last beta release: 0.10 - these notes are no longer supported. Instead please see: Getting started |
Distribution as a Virtual Appliance[edit]
Archivematica is distributed as a virtual appliance which integrates a number of software tools into one common virtual machine environment. A virtual appliance is one file containing a minimal operating system and server software. You can "play" this file with a free virtual machine player like VMware Player or Sun VirtualBox.
This allows Archivematica to be run on almost any workstation or server hardware without compromising the host machine's operating system or application software. At the same time, the virtual appliance is able to interact with any number of networked and/or external storage devices to allow for the flexible implementation of an archival storage and backup strategy.
- See the software page for a full list of the tools used in each system release.
- See the documentation page for instructions on how to use the virtual appliance to accomplish the system requirements.
Minimum hardware requirements[edit]
- Processor: Intel core 2 or AMD Opteron
- Memory: 2 GB for the virtual appliance ('guest') operating system, i.e: if the 'host' operating system has 4 GB available, 2 GB needs to allocated to the 'guest'. Depending on the operating system, machines with less than 2 GB total memory will likely have trouble running Archivematica. Note that the default allocation setting in Archivematica is 512 MB; however, the more that is allocated the better the system will run. The setting can be changed once Archivematica is running.
- Hard Drive space: a minimum of 3 GB to test the system on a small scale (i.e. use the available test files or import a small set of test files); 12 GB or more for larger implementations
Instructions for using the VM image in VirtualBox[edit]
Install Oracle Virtual Box[edit]
- Archivematica uses the Open Virtualization Format and has been tested with the free and open-source Oracle Virtual Box virtualization platform.
- There are VirtualBox versions available for every major operating system.
- Download and install Oracle VirtualBox: http://dlc.sun.com/virtualbox/vboxdownload.html. Note that if you are installing VirtualBox on Windows you will have to click through a number of warnings that you are attempting to install non-verified software.
Download Archivematica[edit]
- Download the latest version of the Archivematica appliance.
- Unzip the Archivematica file. This should result in the following file appearing in an Archivematica folder:
- archivematica-0.10-beta.vmdk
Remember:
Be sure to take note of what location on your computer you choose to extract the file, so you can browse to it later when setting up the virtual appliance (instructions below).
Start Archivematica virtual appliance[edit]
- Open the Oracle VirtualBox virtual machine.
- Click New
- Click Next
- Set the name and type OS type (archivematica, linux-ubuntu)
- Click Continue / Next
- Set Memory to 2 GB (2048 MB) or higher
- Click Continue
- Select 'Use existing hard disk' and browse to and select archivematica-0.10-beta.vmdk
- Click Continue. Review Summary and Click Create
- The virtual box will open with Archivematica 0.10-beta listed on the left-hand side (in some cases "archivematica" will be listed on the left-hand side). Select Archivematica 0.10-beta and click Start (the green arrow in the menu).
- As the virtual appliance starts, you may have to select your machine from the list of available options. Hit return.
- From here it is suggested that you use your external browser to access the archivematica dashboard. Due to an issue with the Ubuntu 12.04.1 desktop, we suggest you add settings to allow the Archivematica dashboard and ICA-AtoM to be accessed from your web browser, outside of the virtual machine. The steps are as follows [Please note, you may need to adjust your virtualbox preferences prior to taking this step. To do so, simply go to the network section of virtualbox preferences and click the "add" button, then save your change):
- Shut the virtual machine down if it is open.
- In virtualbox select the archivematica virtual machine and click on Settings
- Click the 'Network' tab
- 'Adapter 1' should be set to NAT by default (this allows you to get to the internet); click on 'Adapter 2' tab
- Click enable adapter and set attached to 'host only adapter'
- Start the virtual machine
- In your web browser, go to the url http://192.168.56.101/transfer/ (there is no need to login to the Archivematica virtual machine first). For ICA-AtoM, go to http://192.168.56.101/ica-atom/.
- Congratulations! You can now use both Archivematica and ICA-AtoM via your web browser.
- Log into the Archivematica dashboard using the user name demo and the password demo.
- If your mouse pointer does not appear to be working in the virtual machine, click the letter f while holding down the right-hand control button. Do the same thing to switch back to using your mouse pointer outside the virtual box.
- Congratulations, you have a running copy of Archivematica! See Documentation for instructions on how to use the software.


Depending on the setup and configuration of your computer peripherals, you may get this warning the first time you try to launch the Archivematica virtual appliance. Don't worry - it has nothing to do with the installation. We suggest simply checking "Don't show this message again," clicking OK, and proceeding. If you do want some guidance on troubleshooting USB detection in the Virtualbox, you can look at Oracle's troubleshooting instructions for USB detection in Linux here.


Important:
Archivematica may appear to crash when used as a virtual appliance. See Ubuntu login reset issue, below.
Permissions[edit]
Users that are depositing files via ssh should be added to the archivematica group.
This can be done with:
$ sudo useradd -G archivematica Username
In the Virtual Machine, the demo user is already apart of this group.
At a minimum, your deposited files should have the following permissions in order to upload them to the dashboard through source directories in the administration tab: rw-rw---- or rwxrwx---
Turn off virtual machine[edit]
- At the end of your session, turn off the VirtualBox virtual machine by going to Machine > Close > and selecting one of the three shutdown options. It is best to choose either "Save the machine state" or "Send the shutdown signal".


This is from the VirtualBox help manual:
3.4.3. Saving the state of the machine
When you click on the "Close" button of your virtual machine window (at the top right of the window, just like you would close any other window on your system) (or press the Host key together with "Q"), VirtualBox asks you whether you want to "save" or "power off" the VM.
The difference between these three options is crucial. They mean:
Save the machine state: With this option, VirtualBox "freezes" the virtual machine by completely saving its state to your local disk. When you later resume the VM (by again clicking the "Start" button in the VirtualBox main window), you will find that the VM continues exactly where it was left off. All your programs will still be open, and your computer resumes operation.
Saving the state of a virtual machine is thus in some ways similar to suspending a laptop computer (e.g. by closing its lid).
Send the shutdown signal. This will send an ACPI shutdown signal to the virtual machine, which has the same effect as if you had pressed the power button on a real computer. So long as a fairly modern operating system is installed and running in the VM, this should trigger a proper shutdown mechanism in the VM.
Power off the machine: With this option, VirtualBox also stops running the virtual machine, but without saving its state.
This is equivalent to pulling the power plug on a real computer without shutting it down properly. If you start the machine again after powering it off, your operating system will have to reboot completely and may begin a lengthy check of its (virtual) system disks.
As a result, this should not normally be done, since it can potentially cause data loss or an inconsistent state of the guest system on disk.
The "Discard" button in the main VirtualBox window discards a virtual machine's saved state. This has the same effect as powering it off, and the same warnings apply.